Vertical shuttle adjustment. How to properly install the needle. Juki Sewing Machine Repair
 Live Journal
 Facebook
 Twitter
There are already articles on our website that discuss what types of sewing hooks are available for household sewing machines. Recommendations are given with which shuttle to choose a sewing machine. The differences of each of the types of shuttles are considered, including the vertical shuttle installed in inexpensive models of modern household sewing machines. A vertical swinging shuttle is also available for sewing machines such as Chaika, Podolsk 143 and other brands of old-style machines.
Since many people use these machines, this article is more about how the vertical shuttle works. sewing machine Seagull type. The parameters for adjusting and setting the shuttle for such sewing machines are considered in detail.
Almost all stitching defects that appear on the Chaika sewing machine are the result of a violation of the parameters of the shuttle. It is precisely because of the failure of these parameters that the upper thread "winds" from below, stitch skips are formed, the lower and upper threads break, etc. Therefore, if you have such a sewing machine, this article can be very useful to you. At least read it in its entirety.
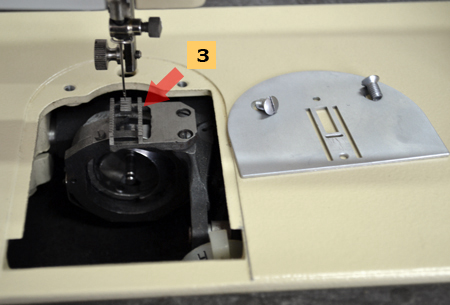
When you remove the needle plate, the first step is to thoroughly clean the shuttle compartment. With a stiff hair brush, clean the tines of the rack (3) from lint and fluff, remove thread fragments and traces of dried oil.

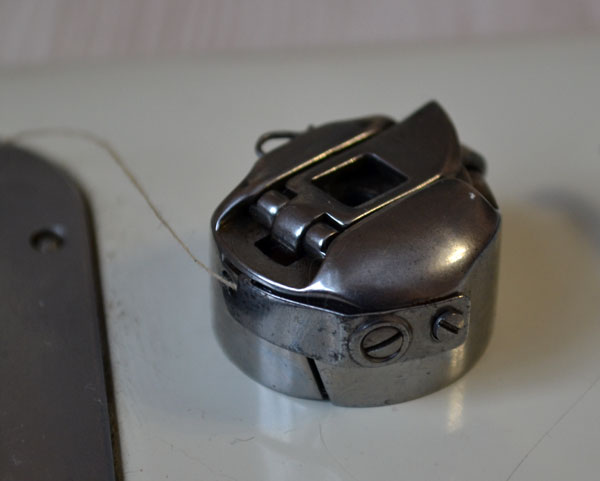
Turn the machine on its side and disassemble the shuttle.

Carefully inspect the surface of the swinging hook. It should be perfectly smooth, without roughness and rust. Even metal oxidation that occurs after prolonged storage in a damp place can cause poor stitching.
Pay special attention to the nose of the shuttle (H), the heel (R) and the "ribs" of the shuttle. The nose should be sharp, not bent or broken off. By the way, if it seems to you that the nose of the shuttle is not too sharp, you do not need to sharpen it. It is advisable to simply replace it, especially since the nose should not be too sharp as the tip of a needle, otherwise, getting into the thread, it will simply cut it like a razor.
The ribs and the surface of the shuttle can be sanded with a cloth cloth, applying a special GOI paste to it.

The shuttle pusher has a special leaf spring. Its purpose is to soften the pressing force, to make it smooth without jerking. At the same time, thanks to the spring, the noise of the vertical swinging shuttle is reduced. After all, its movement is not in a circle, like a rotary shuttle, but pendulum, that is, to the left, to the right. Therefore, the spring is simply necessary here, another thing is that it can also affect the quality of the line as a whole. But most often it is the cause of a thread break.
The meaning of the above is that, wrapping around the shuttle, the thread should easily pass between the petal of the spring and the heel, without stopping and without a "click".
It is difficult to adjust this gap yourself, just look at this photo and compare your shuttle. If the petals are pinched or, on the contrary, too squeezed, then contact the master.


Namely, you need to check the gap between the nose of the shuttle and the eye of the needle on the zigzag stitch. Switch the machine to zigzag stitching and make it as wide as possible (division 5), the stitch pitch does not matter. The nose of the shuttle with the left needle prick should be slightly less than the value (h), but large enough, within 1.3 mm.

But on the right injection, this distance will noticeably decrease, sometimes the nose passes just slightly above the upper edge of the eye of the needle. But it is this parameter that will determine the entire setting of the interaction of the nose of the vertical shuttle. It is because of him that the sewing machine sews perfectly on a straight line, and gaps appear on a zigzag line.
5. Adjusting the vertical swing hook (Seagull)

Before that, we figured out what parameters of interaction between the needle and the nose of the shuttle should be. Now let's figure out how to set them up. It should be noted right away that modern sewing machines with a swinging vertical hook do not have such settings. In any case, if they are produced, then otherwise. But for modern machines, this is not necessary. Since the factory positions of the shuttle are securely fixed. See the device of the modern sewing machine.
Sewing machines of the Chaika type are distinguished precisely by the fact that the settings for the operation of the vertical shuttle can periodically go astray, especially at maximum loads, for example, sewing coarse materials and fabrics.
So, the first thing you need to do is check how the nose of the shuttle runs along the blade (working area) of the needle. This is such a cut off area, located just above the eye of the needle. The nose should pass as close as possible, but without touching the needle. If the size of this gap is important to you, then it is 0.1-0.15 mm. I don’t think it’s so important, so this setting needs to be done visually, using a magnifying glass.
You can move or move the nose of the shuttle by moving the entire shuttle assembly. But for this you need to loosen the screws of its fastening (B).

Now you can adjust the parameters for passing the nose above the eye of the needle when sewing a straight stitch and a zigzag stitch. It is not for nothing that we put this adjustment in the last place of the article. The point is that it is desirable to carry it out experienced master, since you will have to "catch" up to five parameters at the same time. And if at least one of them does not match, various stitching defects will appear. For example, the machine will perfectly do any lines, without allowances and looping, but will periodically break off bottom thread, pay attention not to the top, but to the bottom. The looping of the upper and lower threads also depends on this adjustment and much more.
But if you decide to adjust the vertical swinging shuttle of the Seagull sewing machine yourself, then you need to do just one thing - loosen the screw (D). Then take the pliers in your left hand and firmly clamp the shaft (B) with them. Simultaneously, right hand you need to hold the flywheel. By displacing the shaft in the mount (D), you can change the moment of approach of the shuttle nose to the eye of the needle, higher or lower. Move the shaft carefully, with barely noticeable movements, so as not to knock off the adjustment completely. If you turn the shaft (B) more than it should be and violate the overall adjustment, please note that one cycle of the needle bar movement is equal to two cycles of the vertical hook.
Parameters for setting and adjusting the interaction of the vertical hook rotating in a circle and the sewing needle.
What are the advantages of a horizontal shuttle. How such a shuttle is arranged, its possible malfunctions and ways to eliminate them.
Why did a modern household sewing machine suddenly start skipping stitches in a line? Explains sewing machine repairman.
This article with the wizard's advice on how to independently disassemble a modern household sewing machine brother company, janome, etc.
In this article, you will learn how to find the cause of a malfunctioning electric drive, as well as how to replace the electric motor yourself.
Additional overlock stitches increase the quality of overcasting fabric on a sewing machine. And if you are not going to buy an overlocker in the future, you should pay attention to this when choosing a sewing machine.
The opinion of the master about which sewing machine is the best. Details about the used Rubin sewing machine and other old Veritas models.
Setting up a sewing machine is required:
- for troubleshooting;
- for prevention.
For stable operation, a comprehensive system setting of sewing machines is necessary. Performing it is as important as passing a vehicle inspection. Even if it seems to you that everything is working well, periodic adjustment will help to extend the life of the device and prevent possible damage in time.
If you have already noticed malfunctions, then do not delay with its inspection. The sooner the repair of sewing machines and the adjustment of sewing machines are made, the cheaper they will cost. The main and most typical signs of the need for customization are:
- There are gaps in the line. In this case, you will need to adjust the mechanism that performs looping. You also need to check if the needle is set at the correct level.
- Loose or strong thread tension. It is necessary to correctly adjust the shuttle or check the operation of the tensioner plates.
- The machine does not sew. Most likely the shuttle nest has broken.
- Inaccurate stitch. It is necessary to make sure that the tension of the upper and lower threads is the same.
- There was a strange noise. Most likely, it will be necessary not only to set up the sewing machines, but also to inspect the engine for a malfunction.
- The machine has not been used for a long time or was stored in a damp room. Then you need to clean, lubricate all parts and be sure to carefully adjust.
These are just a few possible faults with which we are contacted. In each case, a competent specialist will first find out how unstable work began. At the end of the work, we issue a guarantee and a discount card to each client.
A vertical hook rotating in a circle is most often found on expensive sewing machines. This is due to the fact that this type of sewing shuttle is more productive and the shuttle stroke works more accurately at high speed. True, it is inferior in some respects to the horizontal type of the shuttle, especially the softness of the move, but it is incomparably more reliable, if only because the shuttle itself and the bobbin case are made of high-alloy steel.
Often a vertical shuttle is called a double-fit shuttle. This term is more suitable for industrial machines, but it can also be attributed to household machines. The very term "double fit" means that in order to form one stitch in a line, the shuttle with the bobbin must turn around its axis exactly two times. Therefore, by the way, it is called rotating, although all types of shuttles rotate, with the exception of some rare cars. But, for example, the shuttle of the Seagull sewing machine or another modern machine of an inexpensive model, the shuttle does not so much rotate as it swings (left - right), which is why it is called a swinging shuttle.
Attachment of the vertical shuttle to the shaft

In this article, we will figure out how to adjust the operation parameters of a vertical rotary shuttle. You may need to adjust the shuttle operation after sewing heavy rough fabrics, materials. The screws pressing the shuttle to the shaft may not hold the load on the shaft and the shuttle will move. Therefore, try not to overload the household machine with sewing fabric that is not intended for it.
It should also be noted that this is not practically possible for all sewing machines (shuttle displacement along the axis), since often a chamfer is removed at the place where the shaft is pressed with a screw. This is not true for all machines, but keep this in mind when looking for the cause of skipped stitches. By the way, I hope that a trained person is reading this article, so I will omit many nuances, such as removing the needle plate to see the shuttle mount.

There are usually two fastening screws, but sometimes more, especially for industrial machines. By the way, this material for adjusting the shuttle can be used to set up any household and even industrial machines. True, without fine tuning, but only as material explaining the general principle of operation of any shuttle.

And now we will regulate, adjust the shuttle.
And the first step is to remove the rail, because it will interfere, but not necessarily. And with this machine, the rake generally just rises up.
And if your eyesight is not very sharp, then prepare a magnifying glass.
In the photo, the arrow indicates one of the important parameters - the gap between the shuttle and the finger. Many people not only do not remember about him, but do not know about him. Namely, this gap often affects the braking of the upper thread while removing it from the bobbin case. Which leads not only to the appearance of such a stitching defect as the looping of the upper thread, but also to its periodic breakage.
I will not give the dimensions of the gap, it is determined empirically. But the larger it is, the easier the thread will pass through it. On the other hand, too much clearance will cause the hook to rotate and jam.

Lower sewing needle to the lowest position and lift it up a little, approximately 1.8-2.0mm.
Thread through white thread into the eye of the needle if this makes it easier for you to adjust the position of the hook point in relation to the eye of the needle.
Hold the needle with one hand (by the flywheel), and with the other hand rotate the hook along the axis (left, right), so that the hook nose is set just above the eye of the needle, approximately 1.5 mm. This is an average and a relative value. Sewing machines with a zigzag stitch need to be adjusted on the left and right injection. But for lockstitch machines or in our case (zigzag machine) as the initial parameter (setting for straight stitching) - 1.5mm is quite a normal value.

The cut off flat section of the needle, just above its eye, is called the blade of the needle. And if you take a magnifying glass and carefully examine it, you can find a number of interesting details. But now it is important for us to understand that the reliability of gripping the needle loop will depend on how tightly the nose of the shuttle will pass along the blade. That is, the smaller this gap, the less often the sewing machine will form skipped stitches. The main thing is to ensure that it is not only minimal, but also that the nose of the shuttle "does not hit" the needle.
In the photo with the naked eye you can see that the gap is simply huge.
However, it is far from always necessary to maintain a minimum clearance, and it is advisable never to set it. Since the seamstress can pull the fabric with her hand, or for another reason, the needle will shift and then the needle will definitely break, at best it will bend.
In addition, there are such unique sewing machines such as manual PMZ that do not form gaps even with a gap between the shuttle nose and the needle blade up to 1 mm. But this is rather an exception, and a design incident inexplicable by science. But keep in mind that for household sewing machines this is not the most important parameter (except for Seagull).
The quality of stitch formation is affected not only by the adjustment (setting) of the shuttle, but also by a number of secondary factors. First of all, adjust the tension of the lower thread.
The condition of the surface of the bobbin case is also important, it should be perfectly smooth like a mirror, without traces of rust, and even more so notches on the screws. That is why try not to twist the screws of the bobbin case once again, do not break their slots.
Last but not least, don't call the bobbin case a hook. A bobbin is inserted into the bobbin case, and the hook removes the thread from the needle and circles it around the cap.
This article contains all the typical and simple malfunctions and methods for repairing a sewing machine.
How does an inexpensive sewing Janome machine and how to repair Janome with your own hands.
In this article, you will learn why a machine with a horizontal shuttle winds and how this defect sewing stitch remove by hand.
How to set up a stitch on your sewing machine? I recently received an email from a reader of my mailing list "How to make money with a sewing machine?" . She asked about how to change the sewing machine from thick fabric to thin fabric and vice versa. In an attempt to answer in detail, I wrote the following text.
Sewing machine settings. How to get normal lines?
There are two types of adjustment of sewing machines: one is done by a mechanic (or someone who understands mechanics), using screwdrivers, pliers, and sometimes even a hammer. The second type of adjustment is carried out by all sorts of turning knobs, screws and buttons located on the typewriter. Everyone who sits down should be familiar with this setting.behind sewing machine
.
Consider all the adjustment options "for users":
-> Presser foot pressure- for thick fabrics, you need to tighten the "bolt" more strongly, which presses the spring that presses the foot. Usually this "bolt" is made in such a way that it is convenient to turn it by hand, and it is located on top of the sleeve of the machine, right above the foot. (at "The Seagull" it seems to be inside, under the lid). For thin fabrics, the presser foot pressure should be loosened.
-> Comb height (lower fabric advancer) - at Seagull it is regulated in the area where the bobbin is replaced. There is a 4 position dial. The position of the cloves is easily monitored visually: for thick fabrics, the cloves should protrude the most, for thin fabrics, they should barely protrude. For embroidery - the teeth are hidden completely.
"Podolskaya" with a tooth height regulator (by the way, not the best modification of the machine, but also nothing) has three options - thick fabrics, thin fabrics and embroidery (the teeth are hidden). Usually this nonsense is not used, unless they are embroidering, but only the upper position is used.
-> Top thread tension - this is understandable, for this there are plates with an adjusting nut. Tighten as much as needed. There are, for example, special operations when the machine has to make loops (in order to assemble later - gather the seam by pulling the lower thread, although I have not come across this in bags). For a regular line, it should not loop.
There is also the concept of "pull". A good or normal tightening is when the stitched parts unfold and the stitches or "grin" between the upper and lower fabric are not visible, and the seam is not gathered. A bad tightening happens when both threads are too relaxed - you need to tighten it.If loops form at the bottom, the first approach to solving is to increase the tension upper thread. However, poor thread tension is not the only problem. See below.
-> Lower thread tension . It is adjusted by a very small screw, which is located on the spring of the bobbin case. Basically, it is rarely regulated, only if the thickness of the lower thread changes very much. Ideally, there is a position in which it sews well with thread thicknesses No. 80 and No. 120 (German system for designating thread thickness). If the tension of the lower thread is very poor, then loops may form at the top. Sometimes this happens even when the bolt on the spring is screwed all the way. This means that the spring itself is deformed or simply relaxed from old age. Temporarily, it can be bent back, having previously removed and bent slightly.
Be sure to check the bobbin thread tension and uniformity by pulling the bobbin thread when the machine is threaded. If the lower thread goes with a slight tension, but freely and without jerks and jams, then everything is fine. If it is too easy, there will be loops and the thread will get tangled in the spool. If there are jerks, then an unsuitable or scratched bobbin is to blame. Also, because of the bobbin, it happens that the lower thread goes very hard.
Sometimes, when the bobbin turns very easily in the bobbin case, the thread gets tangled or breaks. The bobbin should spin with little friction. If there are special thin and flat spring "pads" in the bobbin case that press and brake the bobbin, then this should not happen. But such delights can only be in new cars.If you have an old machine, and it has a too easy bobbin move, this move comes in handy: cut out a small circle from paper (tracing paper) or thin fabric (bologna), slightly smaller in diameter than the bobbin itself, in the middle of the circle we cut a hole for the axis. We insert this circle-washer into the bobbin case. We drip a microdrop of oil onto our impromptu washer, and then insert the bobbin.
A little about sewing machine needles.
You need good branded needles. Chinese cheap ones often come with different burrs, quickly become dull, bend and break. As an option, you can start with them, but if you work seriously, you will be tormented!
If you are interested in the topics of tailoring and design (and in particular bags), as well as you do not mind making money on this - subscribe to my newsletter.
To date, manufacturing companies of sewing machines most often specialize in the production of foot-powered models powered by electric energy. Such devices are very ergonomic, both hands remain free, the time for performing individual operations is significantly reduced. Unfortunately, manual mechanical machines, which were used by our grandmothers, often gather dust without work. Completely wrong! We will deal with the question of how to set up a manual sewing machine, and over time you will be able not to resort to the services of a sewing workshop, creating real sewing masterpieces.
A bit of history
Until 1829, all attempts at the practical creation of a sewing machine can be considered unsuccessful, although the great Leonardo created drawings that could be taken as a basis.
The first sewing device made of wood was created by the French tailor Timonnier. For all its primitiveness, the productivity of this mechanism was several times higher than that of a person sewing by hand. The first sewing machine was met with a rather aggressive reception by the workers, since the mass production of such mechanisms threatened with mass layoffs.
Subsequently, Timonier improved his invention. Some of his ideas are used in today's models. Its peculiarity is that it can work even with the thinnest and most delicate fabrics, for example, with silk.
A shuttle machine, vaguely reminiscent of a modern one, was invented by W. Hunt in 1834. This device was also equipped with a tissue advancement mechanism. The machine was equipped with a horizontal needle. For the first time, the vertical movement of the needle was put into practice in the famous Singer machines.
How is a manual machine?
Almost all old-style manual sewing units have the same principle of operation:
- On the right side is a wheel called a winder. It is driven by hand.
- Next to the wheel is a lever by which the stitch length is adjusted.
- On the left side of the machine there is a shuttle and a needle with presser foot. There is also a regulator for tensioning the upper thread and a lever for raising the presser foot.
- The working surface of the device is equipped with rails that advance the fabric during the sewing process.
How to set up an old sewing machine: general principles
The essence of tuning is to choose the right thread number and needle to work with a particular fabric. The quality of the stitching largely depends on how well the thread tension is adjusted. If the tension is incorrect, the seam “winds” from below or from above.
How to set up a manual sewing machine:
- The bobbin thread tension can be adjusted using the screw located on the bobbin case. The thread tension is stronger, the more the screw is tightened.
- The tension of the upper thread is adjusted using a special regulator, which is located near the lever that raises the foot.
Rules for using the machine "Seagull"
Here are some of the most important rules for using a sewing machine of this brand:
- Do not start sewing without first lowering the needle and presser foot.
- The handle should only be turned towards you.
- To lubricate the machine, use only special oil.
Important! Use the machine only on those fabrics that are suitable for all types of stitches. Otherwise, the machine may become unusable.
How to set up a manual sewing machine "Seagull"? The most important point when setting up the “Seagull” is correct installation threads and needles:
- Turn the knob to set the thread take-up mechanism to its highest position.
- Insert the needle into the holder until it stops, turning the flat side to the rod on which the foot is located.
- Secure the needle with a screw.
- Place the spool of thread on the special pin.
- Pass the thread through the thread guide and friction washers.
- Insert the thread into the thread take-up, and then fix it into the thread guide and needle bar.
- In conclusion, the thread must be threaded into the eye of the needle.
All this applies to the upper thread.
Let's deal with the setting of the lower thread:
- Wind the thread onto the bobbin.
- Insert the bobbin into the cap, bring the thread out.
- Insert the cap back until it clicks.
- Turn the thread tensioner knob.
- Thread both threads under the foot.
Everybody! Now you can sew.
How to set up an old Podolsk sewing machine?
The peculiarity of this sewing machine is that it can be used to sew dense and thick fabrics, such as denim. The machine is quite simple to operate, but at the same time you need to follow simple rules that will extend the working life of the structure:
- In accordance with the instructions, the flywheel of the machine should rotate only in the direction “towards itself” (the direction of movement of the handle is away from the working person). Rotation of the handwheel “away from you” is unacceptable, as the thread in the hook may become tangled.
- When the machine is not in use, the presser foot must be raised.
- Do not start the device without placing fabric under the presser foot, as the teeth of the device that advances the fabric may become dull.
- It is impossible to stretch or push the fabric during operation. The needle may break or bend. The machine itself advances the fabric.
- When working, do not forget to close the front plate tightly over the shuttle.
How to wind the thread on the bobbin?
The Podolsk machine is equipped with a special winding device located behind the machine, near the flywheel.
Important! The work of the winder is carried out together with the tension lower thread device, which is located in the right corner of the platform. Mechanism sewing device during winding thread should not work.
 How to set up an old manual sewing machine of this model:
- The first thing to do is turn off the flywheel so it can't start the car moving. To do this, turn the friction screw located in the central part of the flywheel towards you.
- Install the bobbin on the winder.
- Place the spool of thread on the spool pin.
- Pass the thread from the spool under the take-up washer and then up to the bobbin.
- Press the winder frame down so that the pulley rim is in contact with the flywheel.
- Hold the free end of the thread until there are enough turns to secure the thread. Then cut off the protruding end of the thread.
Important! With proper winding, the turns lie tightly and evenly.
Loading the bobbin into the cap:
- Holding the bobbin with your right hand, insert it into the cap. In this case, the oblique slot of the cap should be on top.
- Then pull the thread through the slot to the tension spring, and then into the slot at the very end of the spring.
- Insert the cap into the machine, bring out the free end of the thread and close the bobbin.
How to install the needle correctly?
The needle is installed when the needle bar is in its highest position.
Important! You need to install the needle correctly. Otherwise, the line will turn out with gaps. The flat part of the bulb of the needle is directed to the left, and the long groove on the blade is directed to the right.
Upper threading:
- Turn the handwheel toward you to set the thread take-up lever with the hole to its highest position.
- Place the spool on the stem and draw the thread towards the eye of the needle.
Important! It is necessary to thread the thread into the eye of the needle outward - from right to left.
Preparing the machine for sewing
How to set up a manual sewing machine, figured out. Now let's get ready for sewing:
- First of all, pull the bobbin thread out. To do this, turn the handwheel of the machine so that the needle first drops, grabbing the bobbin thread, and rises again to the top position.
- After that, take both threads back and bring them under the foot.
- Lower the presser foot onto the lined fabric.
- The machine is ready to go.
Features of setting up mini-machines
This is the best option for occasional use. Outwardly, such a machine looks like a stapler for fastening papers.
Important! The device is freely placed in a lady's handbag. The machine takes up very little space and can be held with one hand.
The resemblance to a stapler is not accidental. The principle of use is about the same, only instead of staples, a spool of thread is inserted on the side. Before threading, it is necessary to wind the thread on the usual standard spool that comes with the device.
Important! You can buy several of these spools in the store and wind threads of different colors on them.
The compact stand-alone machine sews well both thin and heavy dense fabrics. You can use it both at home and while traveling. The design is extremely simple: press the button and sew the fabric.
Service Questions
Repair of the sewing unit is best entrusted to a professional craftsman. However, there are settings that a seamstress can handle on their own. Moreover, in the process of work you have to deal with different types of fabrics. Knowing how to set up an old sewing machine in case of minor problems is necessary.
Presser foot pressure
You can adjust it by tightening or loosening the bolt that presses the presser foot spring. It is located directly above the foot and is made so that it is convenient to twist it by hand.
Important! If you are going to work with thin cloth, the presser foot pressure must be loosened.
Height of teeth for advancing tissue
In the Chaika machine, regulation is carried out using a 4-position disc. The thicker the fabric, the stronger the teeth should protrude. When embroidering, the teeth are completely hidden.
Important! "Podolsk" has 3 positions of regulation of teeth.
Lower thread tension adjustment
It is carried out using a special adjusting nut. Adjustment is made, for example, if loops form from below.
Upper thread tension adjustment
To do this, there is a small screw, which is located on the spring of the bobbin case. Adjustment is made if loops appear at the top during sewing.
Important! Sometimes, when the bobbin rotates too freely inside the cap, the thread often breaks.
New models of sewing machines are equipped with special spring devices that press the bobbin. This is not the case with older cars. You can simply solve the problem of how to set up an old sewing machine:
- cut out a circle with a diameter slightly smaller than a hairpin from fabric or thin paper;
- cut a hole in the center for the axle.
It remains to put a homemade washer in the bobbin cap, drop a special oil for sewing machines on it, and then insert the bobbin.
Care Issues
- If you work on a sewing machine without lubricating it for years, it will, of course, work, but over time there will be various problems and sewing quality deteriorates. But, if you regularly lubricate it, it will last much longer. Lubricate the car once every six months or a year.
Important! When lubricating, use special sewing machine oil. Otherwise, the appearance of a “lining oil effect” is possible, and the machine becomes more difficult to move.
- Clean the equipment of dust much more often. It all depends on what fabrics you use when sewing. Especially a lot of dust from fur, wool and knitwear. After work, it is necessary to sweep the dust under the covers, from the surface of the machine, under the shuttle and the needle plate. You can use a regular cosmetic brush for this.
- At the end of the work, it is necessary to place a small piece of dense fabric (for example, denim) under the foot.
- The machine must be kept in a non-working condition under a cover.
With proper care, the device will work flawlessly, and you will rarely have questions about how to set up a manual sewing machine or repair it. This means that you can easily create original clothes for yourself and look irresistible in it.
- How to create geolocation on Instagram?
- The Eases of Arabic: Personal and Possessive Pronouns
- How to make a charm for a family with your own hands
- Useful properties of watermelon: from peel to seed
- Amaranth - growing from seed, when to plant
- Useful properties of garlic for the human body How garlic affects the body of a woman
- fines in thailand fines for driving without a license in thailand